



 All Castles are Safety Tested & PIPA Compliant
 UK Manufactured Bouncy Castles
 Call today! Open 7 days 9am – 9pm
Setting Up A Bouncy Castle Safely & Correctly – BSEN
CONFORMITY AND STANDARDS
For the purposes of this instructional manual, it is assumed that at some time during the previous 12 months the inflatable and its accessories have undergone annual testing by a qualified inspector and passed as complying with the European Standard BS EN 14960:2006 Inflatable play equipment – Safety requirements and test methods – which is a legal requirement.
SAFE HANDLING
Inflatables can be very heavy and require some care in their handling if injuries are not to be caused. The first requirement for safe handling is that the inflatable was folded and rolled properly after its last use. A good, hard roll, flat at both ends, is so much more easily handled than a floppy heap of PVC. It can be handled and moved on a 2-wheeled sack barrow and easily bowled over onto a truck or trailer. Do not try to lift a complete inflatable. Lift only one end at a time. When the rolled inflatable is lying down, take up a squat position, lean a shoulder into the end and push with the legs. Your leg muscles are the strongest you have and will lift the inflatable onto its end. It can then be easily moved using the sack barrow. When loading the inflatable onto a truck or trailer, stand it up on its end close to the truck or trailer, lean the top onto the edge of the platform and then lift the bottom end and bowl it over.
When loading a petrol blower after an event, be careful not to burn yourself on the exhaust.
SETTING UP OUTDOORS ON GRASS/EARTH
Choose your site The site must be big enough to accommodate the equipment, bearing in mind the open space needed at front and sides and the length of the blow-tube. The site must be level or have a slope of not more than 5 degrees in any direction. The inflatable must be sited well away from possible hazards such as overhead power lines or other obstacles with hazardous projections (e.g. fences and/or trees). The site must be cleared of debris and sharp objects on, or embedded in, the surface.
If, for crowd-control purposes, a perimeter fence is used, it must be at least 1.8m from walled sides and at least 3.5m from open sides. The gateway must be 1.0m wide. If there are guy-ropes on a high inflatable they must be contained within the fenced area.

Clear area around an inflatable
An exception to this rule is when an inflatable with inflated walls is sited directly against a solid wall or walls, for example the walls of a building. In such a case, the solid wall(s) must be 2m higher than the highest platform height. Use of this exception must not result in the creation of additional hazards.
Check the wind
The wind-speed must be no more than Force 5 on the Beaufort scale(maximum 24 mph/38 km/h) which is when small trees in leaf begin to sway. On the morning of the event or the night before, listen carefully to the weather forecast so that you have a good idea of what wind to expect. On the day and during the event, you can check the wind-speed using an anemometer
Position and roll out the inflatable
Make sure that it faces the right way and all ‘siting rules’ have been observed.
Anchor it down temporarily
If ropes form part of the anchorage system, attach them to the anchor-points. The windward side of the inflatable needs to be anchored temporarily while it is inflating so drive anchor-stakes into the ground on the windward side and loosely tie on the windward side ropes. Using industry standard 38cm long x minimum 16mm diameter stakes, there is little risk of penetrating underground services. However, you should check that there are no obvious signs of excavation for cable runs, pipes etc. and check with the client for the location of any underground services before driving the stakes in.
Inflate
Make sure onlookers keep away. Ensure all electrical equipment is suitable for outdoor use. Check that you have the correct size and type of blower and attach it securely to the blow-tube. Tie up any other tubes and close any zips. Switch on the blower and allow the inflatable to inflate fully. Watch the temporary anchorages you have connected in case they are positioned wrongly and pull tight. If they do pull tight, switch off the blower quickly and re-position either the inflatable or the stake, or loosen the rope. When the inflatable is fully inflated, you can push or pull it into its correct position.
Anchor it down permanently
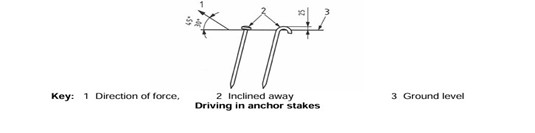
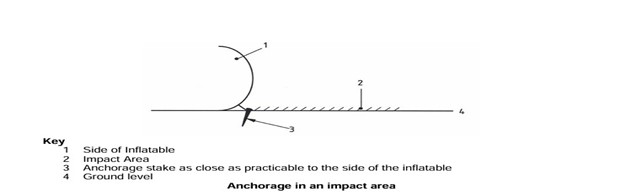
You must use every anchorage point on the inflatable because their number and positioning has been calculated for each inflatable. Drive an anchor-stake into the ground for each remaining anchorage point and securely connect the ropes or webbings. The original temporary anchorages might want moving so as to be in the correct position. The stakes need to be positioned so that the ropes or webbings go upwards from the stake towards the inflatable at between 30 and 45 degrees. Moving the stake closer makes the angle bigger. Moving it away makes the angle smaller. The stakes should be driven into the ground slightly inclined away from the inflatable and the ropes or webbings should not be pulled too tight. They should curve gently up to the inflatable so as to allow movement of the inflatable up and down when in use. The stakes should protrude no more than 25mm above the ground. If the inflatable requires anchorages in the impact area, make sure the stakes are as close in to the base of the inflatable as possible.
Adjust the position of the blower
The blower needs to be moved as far away from the inflatable as the blow-tube will allow and then moved forward 50mm so as to leave a little free play between blower and inflatable so that the blower is not pulled when people are bouncing. Note: The blower must stand at least 1.2m away from the inflatable.
Check the working pressure
All inflatables need sufficient internal air pressure to make them stand up and assume their correct shape and to support the weight of the users. You can check the pressure is sufficient inside the inflatable by standing on the lowest part of the inflated base (usually the step) with your feet together and making sure that your feet do not touch the ground through the inflatable. You must stand at least 50cm from the edge. If you are heavier than the intended user and your feet do not touch the ground, then the pressure will be sufficient. If you are lighter than the intended user, get a heavier person’s help. If you are using a petrol-engined blower, regulate the speed of the engine so that the pressure inside the inflatable is not too great. An electric blower does not need regulating.
Make sure your blower is safe
If you are using an electric blower, route the cable(s) out of the way of users and onlookers. Use an RCD circuit breaker somewhere in the line. If you are using a petrol engined blower, make sure no-one can burn themselves on the exhaust pipe and that the petrol cap is on. Keep your spare petrol out of sight and stored in a bund container. When you need to re-fill with petrol, stop the session and get everyone away. Switch off the blower and let it cool for a few minutes. Then use a funnel to re-fill the petrol tank so that no petrol is spilled. Return your spare petrol to its hiding place. Re-start the blower and, when the inflatable is fully inflated, start the session again.
Do you need mats at the entrance?
If the grass or earth is soft and not abrasive, it may not be necessary to use landing mats all around the entrance/exit, because soft grass and earth have sufficient impact attenuating properties for the maximum allowed fall-off height of inflatables (60cm). However, if the grass or earth are hard and abrasive, you will need to install landing mats over the whole of the impact area.
SETTING UP OUTDOORS ON HARD STANDING
Anchoring
On hard standing, you will be unable to anchor with stakes driven into the ground. Each anchor point must be attached to something which will withstand a force of 164kg. This could be weights or sandbags, vehicles, provided they are immobilised and under your control, or fittings already in the ground. If you are near the edge of hard standing, you can sometimes anchor the rear and one side of the inflatable with stakes into the ground beyond the hard standing, leaving only one side to be anchored in the ways suggested above.
Use landing mats
On hard standing you will definitely need landing mats, covering the whole of the impact area, and you will need to be on your guard against them moving when the session is in progress.
Protect the base
If the hard standing is abrasive, you must use a groundsheet under the inflatable so as not to wear out the base of the inflatable.
Keep the blower still and in position
A blower, running on hard standing, tends to move around because of the vibrations. Stand the blower on a rubber mat to avoid this.
SETTING UP INDOORS
ls the site suitable?
You must check that there is enough floor-space on which the inflatable can stand with its blow tube fully extended and that there is plenty of space (3.5m) where the users get on and off. The height of the ceiling must be sufficient to allow the inflatable to inflate fully without touching and high enough to prevent users from touching the ceiling or any other fittings such as lights. If there is some doubt about the height, stand by the blower when inflating so that you are ready to switch off quickly if any part of the inflatable is too tall.
Does the inflatable need anchoring?
Much depends upon the size and weight of the inflatable and the size of user. The inflatable will not blow away when indoors, but it could move across the floor and it could overturn. An inflatable with a small base and high side-walls is particularly prone to overturn if there are tall users and they make a concerted effort to run from side to side throwing themselves against the walls. This type of action on any small inflatable will at least cause the inflatable to move sideways thus putting the blower out of position and threatening to pull the blow-tube off of the blower. This tendency can be combated by the use of weights tied to the anchor-points, or by attaching the anchor-points to gym bars or any other secure fittings. Sideways movement can be counteracted by placing rubber mats under the inflatable. Likewise, a rubber mat must be placed under the blower to keep it still.
Protecting the base
If the floor is not abrasive, there will be no need to use a groundsheet under the inflatable.
Landing mats
You will definitely need to use landing mats to cover the whole of the impact area and be wary of them moving while the equipment is in use.
Where is the impact area?
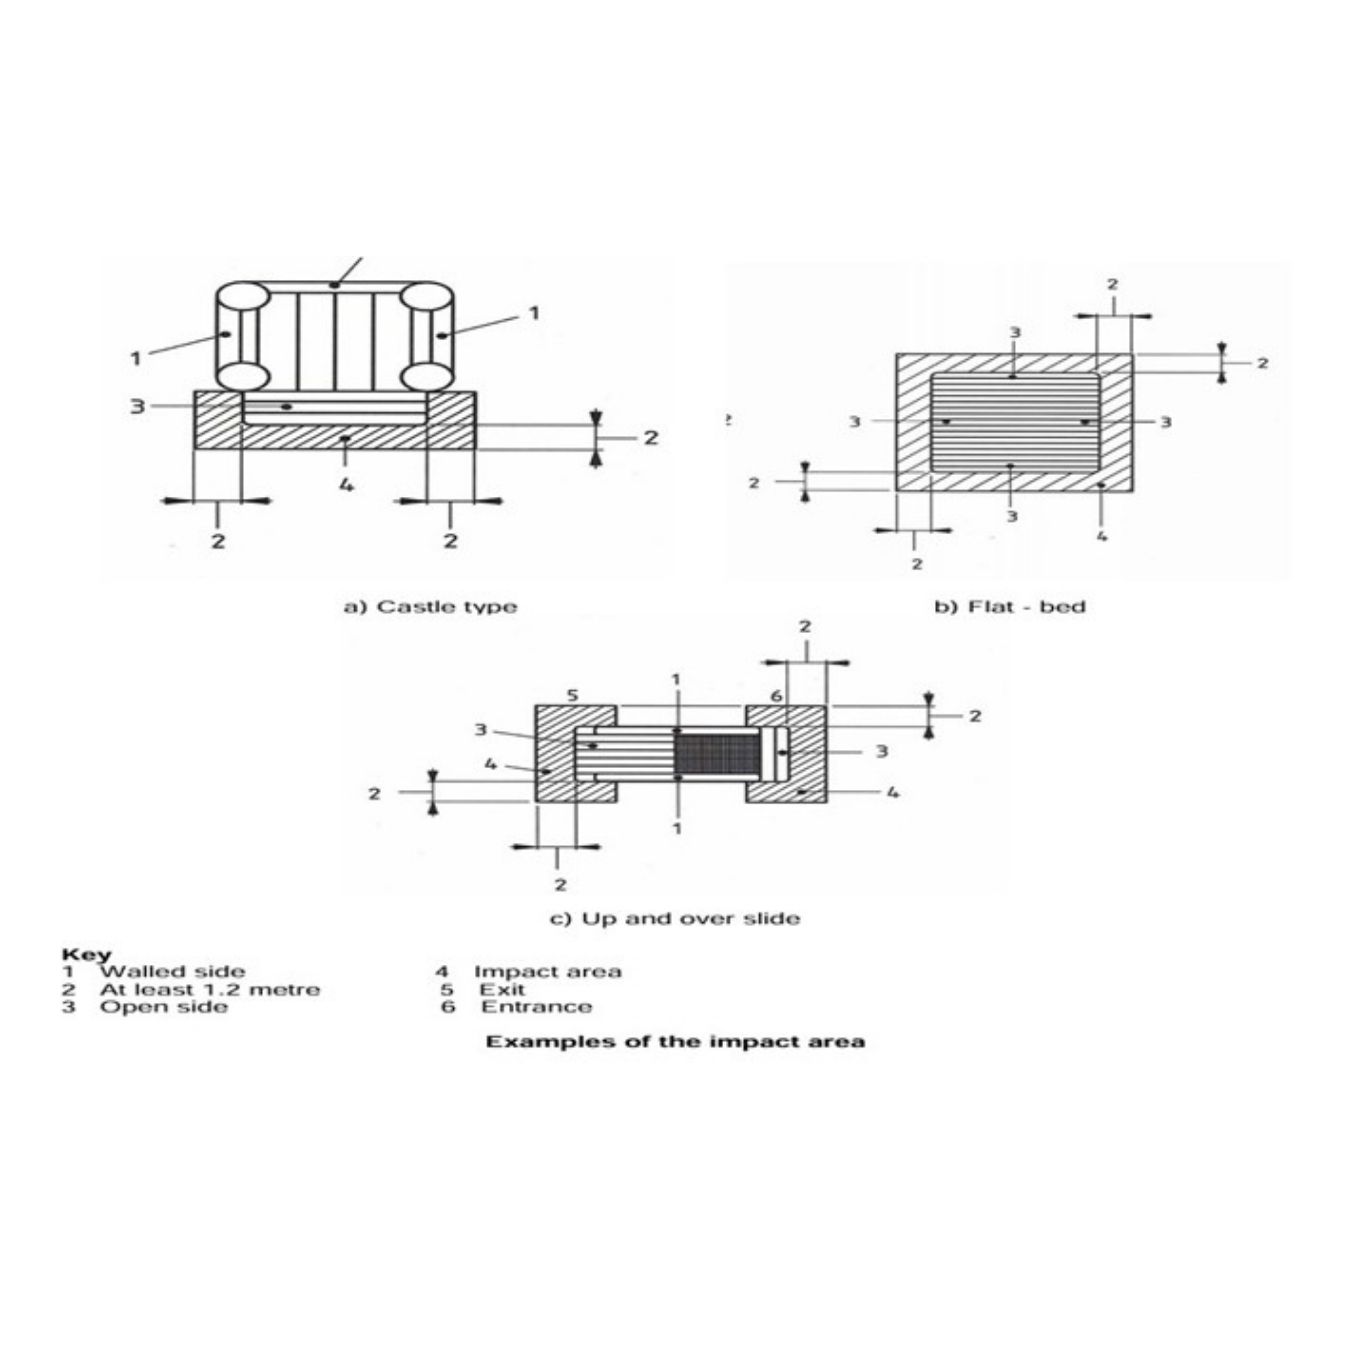
The impact area has been mentioned several times previously. It is the area of ground immediately next to any open side of the inflatable and it extends to 1.2m away. For instance, on an ordinary castle with 3 walled sides and one open side with a full width step, it is the area, shaped like a U, all around the step. Here are a few common examples: